Earlier this year I
suggested that because Microsoft was unbundling Windows Media Center
from Windows 8, fans of the former should avoid upgrading to the latter.
Thankfully, Microsoft plans to charge a reasonable (but still
annoying) $9.99 for Windows Media Center. Given how few users actually
use the product, I can live with that.
Of course, free is always better. And if you have Windows 8 Pro, you
can get Windows Media Center free for a limited time. Here's how:
1. Head to Microsoft's Feature Packs page, scroll down a bit, and fill out the short form to request a free product key.
2. Once you've received the e-mail with the key, press Windows-W (i.e. hold down the Windows key and tap W) to bring up the Settings menu, then type add features.
3. Tap or click Add features to Windows 8, then tap/click I already have a product key.
4. Type or paste in your product key, click Next, read every last word of the licensing agreement (kidding!), and then click Add features.
Presto! You've got Windows Media Center—after a reboot, of course. Some things never change.
This offer is good through January 31, 2013, so you've got time.
However, if you don't have the Pro version of Windows 8 and you want
WMC, you'll need to pony up $69.99 to get the Windows 8 Pro Pack.
Something to think about as you ponder your OS upgrade plans.
Don't let the Windows 8
haters brainswash you: Microsoft actually introduced a few great
features in its new operating system, some of which will help keep you
safer from malware and other security threats. Though most of these
security enhancements are active by default, you still must be proactive
to get the most from them. Also, one new Windows 8 feature presents
specific security concerns that must be addressed to keep your PC—and
your data—as safe as possible. Let's jump in and investigate.
Buy a new PC instead of upgrading
To take full advantage of Windows 8’s new security features, your PC
needs to run a new kind of boot system called Unified Extensible
Firmware Interface (UEFI). This system, which replaces the archaic Basic
Input/Output System (BIOS), adds many new boot features and greatly
speeds the startup process.
Included in UEFI is a feature, called Secure Boot, that helps prevent
unauthorized operating systems and malware from running at startup.
This makes it more difficult for data thieves to use bootable discs or
flash drives to access your files; it also helps keep rootkits—a form of
malware that's hard to detect—from infecting your computer during
bootup.
Some PC vendors included UEFI on select systems in the past, but
Secure Boot requires a new version, specifically UEFI revision 2.3.1. So
if your system originally came with Windows XP, Windows Vista or
Windows 7, it likely doesn’t include UEFI. And if it does include UEFI,
it’s probably an earlier version that doesn’t support Secure Boot.
Though some PC and motherboard vendors offer upgrades to UEFI, you
might want to consider buying a new PC or board that’s designed for
Windows 8, as such hardware must include UEFI and have Secure Boot
enabled by default.
Look for new PCs and devices that carry this logo.
If you’re technically inclined, however, you can double-check an
older PC’s UEFI compatibility before you run out and buy a new system.
First, try pressing the traditional BIOS or setup key (such as F2 or
Delete) during booting just after you turn on the system. There, you can
find your BIOS or UEFI version.
From Windows, you can type msinfo32 in the Start
menu search field or the Run prompt to find the BIOS version. If it
appears you have a traditional BIOS, you could check with the system or
motherboard vendor to see if it's offering upgrades to UEFI. And if the
UEFI version you have is older than 2.3.1, see if there are any updates
for your PC.
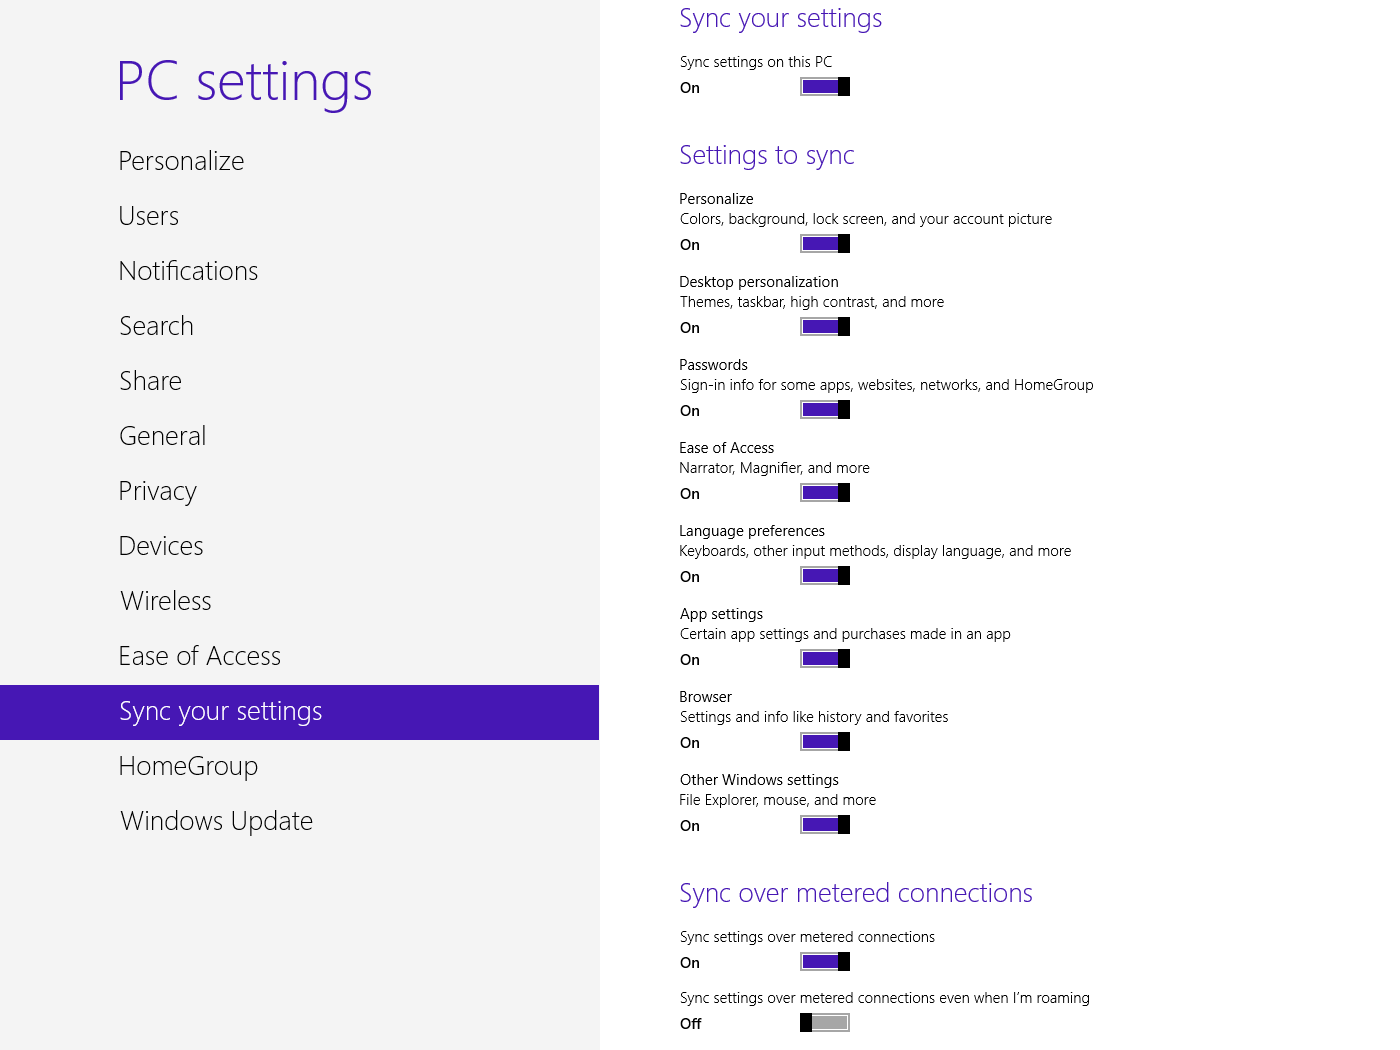
Take precautions when using a Microsoft account
In Windows 8, you can now optionally sign into Windows with a
Microsoft account using your email address. This account stores many of
your personal Windows settings, preferences, and saved passwords, as
well as other items like browser history, favorites, and Windows 8 apps,
on Microsoft's servers. Whenever you log on to a new Windows 8 device
with that Microsoft account, all your data automatically syncs to your
new hardware.
You can change the sync settings via the new PC Settings app.
Although this new syncing functionality can be useful, it does pose a
security risk. If malcontents get your Microsoft account password, they
could log in to your account at another Windows 8 PC and access your
synced data. And if you use Microsoft’s SkyDrive cloud storage service,
they’ll quickly be able to access your online files.
To help prevent your Microsoft account from being hacked, use a strong password when creating your account in Windows 8. Try to make it as complex as you can
with lower- and uppercase letters, numbers, and special characters, and
avoid words from the dictionary. Also make sure to use a unique
password. If you simply re-use the same old string that gets you into
other sites and services, you're just asking for trouble. Finally, you
should avoid storing any truly sensitive documents in SkyDrive.
If you already have a Microsoft (or Windows Live) account, you can
use it when logging into Windows 8 instead of creating a new account.
And if your existing password isn’t strong, you can always change it.
Fortunately, your saved passwords from Internet Explorer, networks,
and Windows 8 apps aren’t synced to a new system until you confirm it as
a “Trusted PC.” Once you sign in to a new Windows 8 system, Microsoft
sends you an email and/or a text-message alert asking you to confirm it.
This is a great protection mechanism, but if you’re using a Microsoft
email address (Hotmail, say), or if someone knows both your Microsoft
account and your other email password, he could confirm the PC he’s
using as trusted and then access all your saved passwords.
To help make the process of confirming trusted PCs even more secure,
use a non-Microsoft email address for your Microsoft account, and use a
different password for that email account (which you should be doing
anyway). Also make sure to enter your mobile number on your Microsoft
account and update it when it changes. You can always add and change email addresses and mobile numbers.
Choose your antivirus program wisely
Windows Defender looks and works much like Microsoft Security Essentials.
Windows 8 comes with built-in antivirus software as part of the
updated Windows Defender program. However, if your PC manufacturer
included a third-party antivirus program with your computer, Windows
Defender may be disabled. Either way, make sure you have some form of
antivirus program installed and enabled. And if you're considering a
commercial antivirus suite, compare the different security suites and
choose one that offers good protection—our recent security suite roundup is a good place to start.
Bottom line
We’ve discussed some security concerns with Windows 8 and how to
combat them. Remember, in order to use the new Secure Boot feature, you
need to purchase a new system that is Windows 8–certified, or make sure
that your current system supports it before upgrading from a previous
version of Windows.
If you log in to Windows using a Microsoft account, take the extra
precautions I’ve described to secure your data. Use separate and unique
strong passwords for both the Microsoft account and the email account
you use. Don’t store sensitive files in your SkyDrive online storage
account. And keep your Microsoft account up-to-date with your mobile
number.
Even though your Windows 8 PC might come with the built-in Windows
Defender or a third-party antivirus program turned on, compare your
options and choose one of the better antivirus programs.
Windows 8, I want to love you, but your annoying quirks keep bringing me down.
After spending more than a year conquering the operating system's
overhauled (and nonintuitive) interface in its various prerelease
iterations, I've now entered a second stage of frustration: I find
myself cursing at Windows 8's major changes less and less, but shaking
my fist and swearing like a sailor at its little irritations more and
more.
Beyond its polished, tile-based surface, Microsoft's new operating
system plays host to a legion of smaller annoyances—a cornucopia of
quirks that will leave you seething long after you get the hang of all
the new gesture controls and schizophrenic system options. Some of the
problems are whoppers. Others are mere nitpicks that result from a
lifetime of traditional Windows use. But many of these problems can be
fixed, with one major exception. Read on!
Lock down the lock screen
Disabling the lock screen is but a hidden option away.
Let's start at the very beginning of the Windows 8 experience. Lock
screens make sense on a tablet, but on a PC the lock screen becomes just
another superfluous click in a sea of nonstreamlined Windows 8
controls. Fortunately, banishing the Windows 8 lock screen from your
life is easy.
Open the Run command box by searching for "Run," pressing Windows-R, or
moving your mouse pointer to the lower-left corner of the Desktop
screen, right-clicking, and selecting Run in the Quick Access menu.
Now type gpedit.msc and press Enter to open the Local Group Policy Editor. Navigate to Computer Configuration > Administrative Templates > Control Panel >Personalization in the left menu. Double-click the Do Not Display the Lock Screen option in the main pane to open a new window. Select the Enabled radio button, click OK, and you're done. Buh-bye, lock screen!
Press Start to continue
Enough words have been written about Windows 8's missing Start button to
fill the Library of Congress twice over, so I won't spend much time on
it. But if you're looking to bring back the Start button and possibly
even banish the live-tiled Start screen for good, check out the free
(and awesome) Classic Shell program. We cover it in-depth in our roundup of free tools designed to bend Windows 8 to your will.
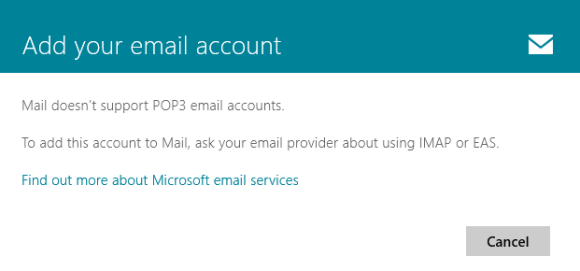
No POP for you!
That POP option in the Mail app? It's a trick.
One of my biggest Windows 8 irritations is its lack of POP email support
in the native Mail app. I get it, Microsoft: IMAP's syncing
functionality fits better into the cloud-connected, work-everywhere
vision you have for Windows 8. But tell that to all the nontechie people
who lean on me for computer support, and who rely on the POP email
addresses that their ISPs handed out.
If you're running Windows 8 and need to keep tabs on a POP email account, I first recommend downloading Mozilla's free Thunderbird email application
and using it in Desktop mode. But if you don't want to do that (or if
you're running Windows RT), you have a workaround for Microsoft's POP
reluctance, though it's somewhat clunky.
The key lies in the Mail app's support for popular webmail clients,
including Gmail and Outlook.com—two free favorites that just happen to
be able to connect and link with outside POP email accounts. See where
I'm going here? Just create a free email account with either service,
and then link your POP mail account to it using the tutorials supplied
by Outlook.com or Gmail.
After persuading your POP account to play nice with your Outlook.com or
Gmail account, add your chosen webmail service to the Windows 8 Mail app
through the normal means. Voilà! Your POP mail will work its way into
the Mail app inbox by way of its webmail proxy.
Here's the kicker: When you send email, the Mail app will let you use
only your webmail email address, not your POP mail address. There isn't
any way around the limitation, but at least your messages will land in
your inbox.
No DVD playback? No problem!
VLC's myriad media options include full DVD playback.
Windows 8 still includes Windows Media Player, but the new version of
the program lacks DVD playback support. If you've yet to take the plunge
into a digital-only lifestyle, you could spring for Windows 8 Pro and
the optional $10 Media Center Pack (which Microsoft is giving away free
to upgraders until January 31, 2013). This is one solution, but I
recommend downloading the free and flexible VLC instead.
VLC isn't as polished as Microsoft's Media Center software, but it's
jam-packed with utility, offering full DVD playback and ripping support,
robust file-transcoding options, the ability to tune in to Internet
videos and podcasts alike, and even spotty Blu-ray support if you enlist
the help of add-ons with questionable legality. Our guide to mastering VLC will get you up and watching in no time—and for no money.
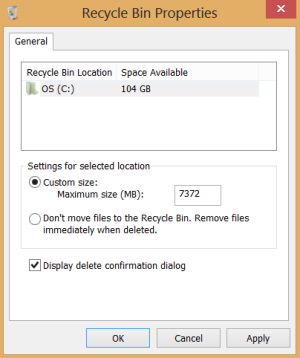
Just what do you think you're doing, Dave?
The Recycle Bin properties screen.
Unlike HAL (and Windows 7), Windows 8 isn't pleading or pushy when you
want to get rid of a file. Deleting something sends the item straight to
the Recycle Bin, no confirmations necessary. Ironically, this may be
the one case when you can perform a task in fewer clicks than you could
in previous iterations of Windows. That said, the old-style confirmation
prompt has saved me from errantly deleting something important on more
than one occasion.
If you want to bring back the warning, right-click the Recycle Bin and select Properties. Simply check the Display delete confirmation dialog box in the new window, click OK, and you're good to go. Getting rid of the option is as easy as removing the checkmark once again.
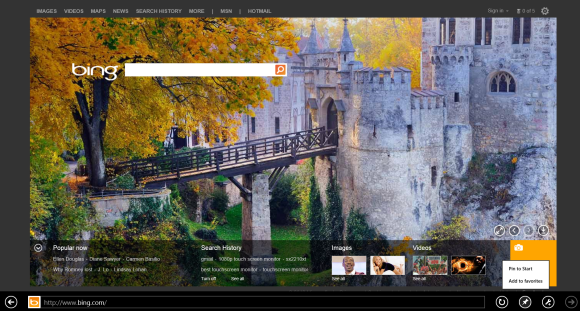
Forget the Bing app
Skip the Bing app, and pin the Bing website instead.
I'm a Google fanatic, but when I'm tooling around in Windows 8's Start
screen on a touchscreen device, I find that the Bing search app's
picture-heavy aesthetic fits very nicely with Windows 8's Modern design.
Like many Modern-style apps, however, the Bing app includes an
irritating quirk: Selecting a search result pops you out of the Bing app
and opens the page in Internet Explorer. It's a mild annoyance in the
grand scheme of things, but it still drives me nuts.
You can have your attractive cake and eat it too by pinning the Bing.com
website to the Start screen. Head to Bing.com, click the Pin This Site icon in the toolbar, and then select Pin to Start. Annoyance averted.
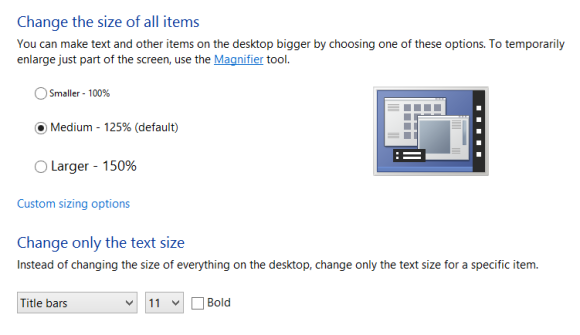
Higher resolution, lower readability
Desktop image sizing options: Not just for the hard-of-seeing.
Windows 8 has spurred a whole new hardware type: the laptop-tablet
hybrid. Many of these devices sport 1080p IPS displays that are
breathtaking to behold. I've had the opportunity to test a few hybrids
extensively, and I've found that the blessing of a high-resolution
display comes with an accompanying curse.
Many convertibles stick to an Ultrabook-type form factor, squeezing that
1080p resolution into a 10- to 12-inch screen. The ultrapacked pixel
density makes for a razor-sharp picture, but text appears a bit too
small for my taste in desktop mode. Fortunately, a trick that helped
farsighted folks browse with ease in Windows 7 still applies in Windows
8.
Right-click anywhere on the desktop, select Screen Resolution, and then click Make text and other items larger and smaller. The Change the size of all items
option works great if you plan on sticking to a touchscreen interface,
boosting the size of icons and text alike to make them finger-friendly. I
prefer using the Change only the text size option on
hybrid-type devices that include a touchpad or mouse, however. The
drop-down menu includes a bevy of text types, each of which you can
individually alter to suit your particular needs.
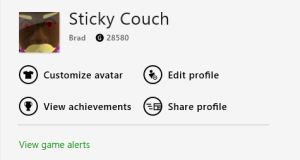
The one that got away
That's the avatar face of anger.
Unfortunately, Windows 8's single-most oppressive annoyance can't be
fixed by minor tweaks, or—as I was told after spending hours on the
phone with multiple support representatives—by Microsoft itself.
I'm a huge proponent of the system's ability to transfer basic settings
and files between multiple computers with the help of a cloud-connected
Microsoft Account. I've accumulated several Microsoft Accounts over the
years, however. One exists solely to maintain my Xbox Live gamertag,
with more than six years' worth of achievements, Microsoft points, and
associated purchases tied to it. Another Microsoft Account plays host to
my grandfathered 25GB SkyDrive account, and all the files inside. I
rely on a third as my primary Microsoft Account login.
There is no way to merge the multiple accounts into a single, comprehensive Microsoft Account.
The aforementioned support calls proved unhelpful in clearing up the issue. Taking to the Internet, I found this July 2012 forum post
by a Microsoft representative stating that the company has no plans to
introduce an account-merging option. "I think it would be a nice
feature, but it was repeatedly assessed as too costly compared to other
needs," he said.
That sucks for a long-term Microsoft fan like myself, especially since I
jump from computer to computer frequently. I've resigned myself to the
fact that I need to juggle three separate Microsoft Accounts in order to
keep full functionality. Signing out of my main account and back in
with my secondary accounts on the SkyDrive and Games apps doesn't take
long, but it's frustrating, all the more so because I won't have any way
to fix this particular irritation at any time in the foreseeable
future.
Ah, well. You can't win 'em all, I guess.
One thing you might
have noticed about Windows 8 is its new boot loader (i.e. the screen
that appears shortly after you start your PC). It has a graphical
interface, which is nice, but it's not great for anyone who prefers a
dual- or multi-boot setup, and it also makes it a little harder to get
to advanced boot options
Boot UI Tuner is a free utility that gives you greater control over Windows 8's boot options. (WARNING: When you click through to the developer's download page, make sure you don't click the blue Download button. That's an ad banner. Instead, scroll down near the bottom of the page and choose the gray Download button.)
This tiny, portable program (meaning it doesn't need to be installed—you simply run it) comes in both 32- and 64-bit versions.
When you first go to run it, you'll likely encounter interference
from Windows 8's SmartScreen, which will tag it as an "unknown" program
and prevent it from loading. However, you can click More Info and then Run Anyway to get things moving.
From there, it's simply a matter of selecting or de-selecting various
options. For example, you can turn off three default items—Enable Windows logo, Enable messages, and Enable loading circle—in an effort to speed boot performance and minimize screen clutter.
Mostly, however, you'll probably want to enable the top two self-explanatory options: Enable advanced options of boot menu and Enable editing of boot options at startup.
If you want to go old-school, click Enable legacy boot menu to see the familiar Windows 7-style boot loader.
Once you've chosen your options, click Apply and then reboot.
In a world exploding
with tablets and touchscreens, Microsoft's decision to saddle Windows 8
with the finger-friendly Modern interface formerly known as Metro makes a
lot of sense—for Microsoft. But if you're among the majority of Windows
users who aren't using a tablet or a touchscreen, the focus on Live
Tiles and mobile-centric apps is more of a frustration than a feature.
Vexingly, Windows 8 is riddled with sneaky ways to drag you out of the
desktop and dump you on that shifting, shiny Start screen.
Windows 8 and its controversial interface will come preinstalled on
practically every computer sold over the next few years, but fear not!
Die-hard desktop jockeys don't have to learn to stop worrying and love
the Live Tiles.
Here's a step-by-step guide to banishing the Modern interface from
your Windows 8 life. Once it's gone, you might just come to appreciate
Windows 8 even more than you do Windows 7. I have.
Set the stage
The Google Chrome icon.
Given the Modern interface's deep hooks in Windows 8, it's hardly
surprising that cutting the cord isn't an instantaneous one-snip
process. Every major program you might need for everyday use—from Mail
to Messaging to Video—shows up in Modern app form, rather than as a
proper piece of desktop software. So before you can excise Modern, you
have to find some desktop alternatives for the default apps.
Your critical mix will undoubtedly differ, but I found that I could satisfy my basic needs with Thunderbird, a free email client that blows the pants off the Windows 8 Mail app; Digsby,
a versatile IM client that works with a cornucopia of chatting services
(unlike the Windows 8 Messaging app); the Spotify desktop app, to replace the sultry streaming tunes of the Windows 8 Music app;
the SkyDrive desktop app, which is far more flexible than its Modern
app counterpart; and Google Chrome. (Sure, Windows 8 includes a desktop
version of Internet Explorer, but I prefer Google's browser.) If you
want to be able to play DVDs on your Windows 8 machine—something that
Windows Media Player doesn't do by default—I recommend picking up VLC along with the other things you're busily downloading.
Once you've compiled a hefty stash of desktop programs, you'll want
to make the most-used ones readily accessible, since Windows 8 lacks a
Start button. Cluttering up your desktop with shortcuts is one approach,
but I prefer to pin icons for my most-used programs to the taskbar.
Right-click a program and select Pin to Taskbar to do just that. I use the same trick to pin a Control Panel icon to the taskbar.
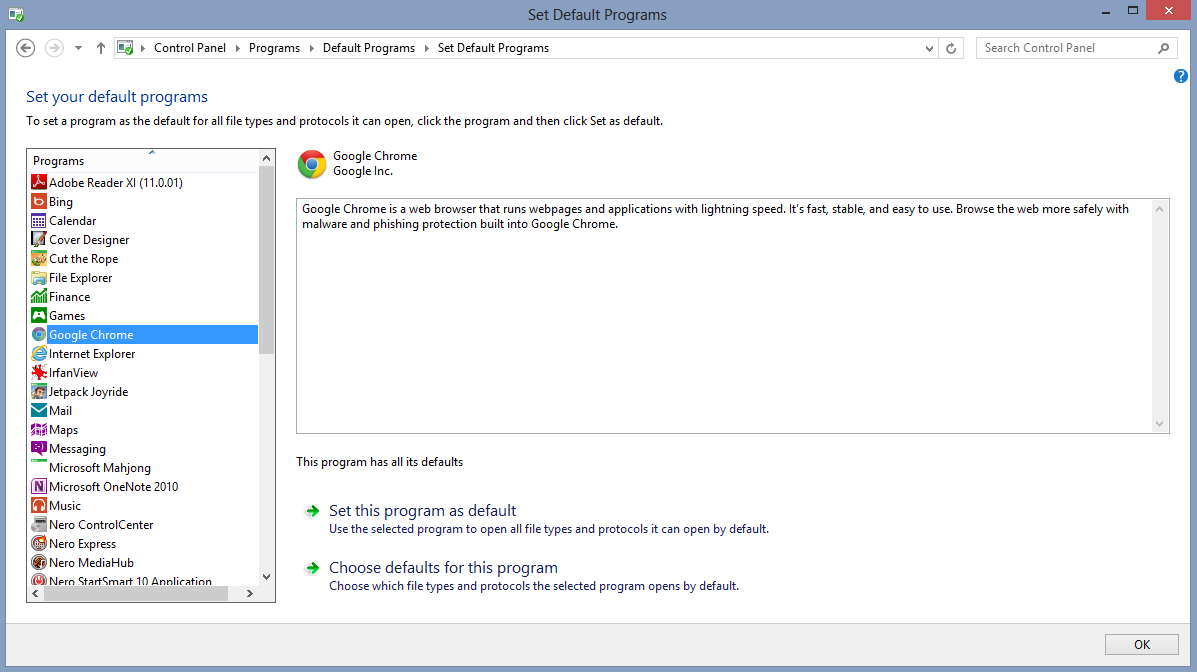
Diddling with defaults
Changing your default programs is an important step in exorcising the Metro interface.
Next, you'll want to make those programs the defaults for opening
their associated file types—to prevent Windows 8 from opening files with
the Modern apps that ship with the system. When you launch them for the
first time, many programs will ask whether you'd like to make them the
default; just say yes!
Now either search for 'Default programs' on the Modern Start screen (we haven't banished it yet!) or select to Control Panel > Programs > Default Programs > Set your default programs.
(That's why I like to have access to Control Panel from the taskbar.)
You'll see a list of all of your PC's programs. Click each of your new
desktop programs in turn, enabling it as the default option for its
associated file types. If you didn't download VLC, be sure to enable
Windows Media Player as the default for video and audio files, or you'll
be dumped into one or the other of the Modern interface's slick, vapid
Video and Music apps, whenever you open a media file.
Searches and Start button replacements
Here's where things get interesting. Just how much do you hate the
Modern Windows 8 interface? The answer makes a crucial difference in how
you should arrange to sift through your apps and search your system.
If you absolutely, positively, soul-searingly loathe the new look of
Microsoft's operating system, you'll want to download a program that
restores the traditional Start button to the Windows 8 desktop. That
way, you'll never have to return to the Windows 8 Start screen to search
for specific software or files that aren't already pinned to your
Taskbar or otherwise present on your desktop. Start8 and Classic Shell are excellent options for doing just that—and they give you the option of booting directly to the desktop. Win-win!
After months of using Windows 8, day-in and day-out—both with and
without Start button Band-Aids—I recommend that you swallow your Modern
misgivings in this solitary circumstance. Windows 8 has powerful search
capabilities that rock, and I've come to appreciate them much more than the staid ol' Start button.
Unlike the rest of the Metro interface, the All Apps screen is surprisingly handy even on a PC.
Biting this bitter bullet doesn't mean swimming in Live Tiles,
though. Instead, you can create a desktop shortcut that rockets you
straight to the Modern All Apps screen (or as I call it, my new and more
efficient Start menu).
To do so, right-click on your desktop and select New > Shortcut. Copy and paste the following text into the Location box, and then click Next:
%windir%\explorer.exe shell:::{2559a1f8-21d7-11d4-bdaf-00c04f60b9f0}
Give the shortcut a name—I went with the straightforward "All Apps"—and then click Finish.
At once, a shortcut to the All Apps screen appears on your desktop,
which you can pin to your taskbar if you so desire. The All Apps screen
includes a full-screen list of all the programs on your computer, or you
can start typing the name of a file to initiate a search.
Boot straight to the desktop
After you've set up your desktop programs as defaults and sorted out
your Start button dilemma, you need to configure your PC to boot
straight to the desktop, bypassing the Windows 8 Start screen.
Using Windows 8's own built-in Task Scheduler to bypass the Metro Start screen is a delicious irony.
First, open the Task Scheduler by typing Schedule task in the Settings search on the All Apps screen, or by deep-diving to Control Panel > System and Security > Administrative Tools > Schedule Tasks.
Once the Task Scheduler is open, click Create Task under Task Scheduler Library in the Actions pane. Name your task "Boot to desktop" or something similar. Open the Triggers tab, select New, and choose At log on in the 'Begin the task' drop-down menu at top. Click OK, and then open the Actions tab, select New once again, and enter explorer in the Program/script field.
Save the action and the task, and you're done! From now on, every
time you log in to Windows, you'll automatically jump to the desktop,
where an open Libraries folder will greet you.
Setting up to shut down
Can you taste your future Metro-free life? We're almost there. The
final step involves creating a custom Shutdown button for your desktop,
so that you won't have to "Swipe the charm bar"—the teenager in me just
giggled—ever again.
Right-click any empty space on your desktop, and choose New > Shortcut. Copy and paste the following text into the Location field, and then press Next:
shutdown /s /t 0
On the next screen, name the shortcut "Shutdown" and click Finish.
The shortcut will appear on your desktop, sporting a generic icon. Swap
the icon out by right-clicking the shortcut and choosing Properties. Open the Shortcut tab and click the Change icon button at the bottom. A big list of available icons will appear—I recommend using the Power button icon.
I also recommend placing the Shutdown shortcut far away from any
other files on your desktop. The shortcut shuts your computer down
immediately, without any warning or additional prompts, and it's a major
pain if you click it by accident.
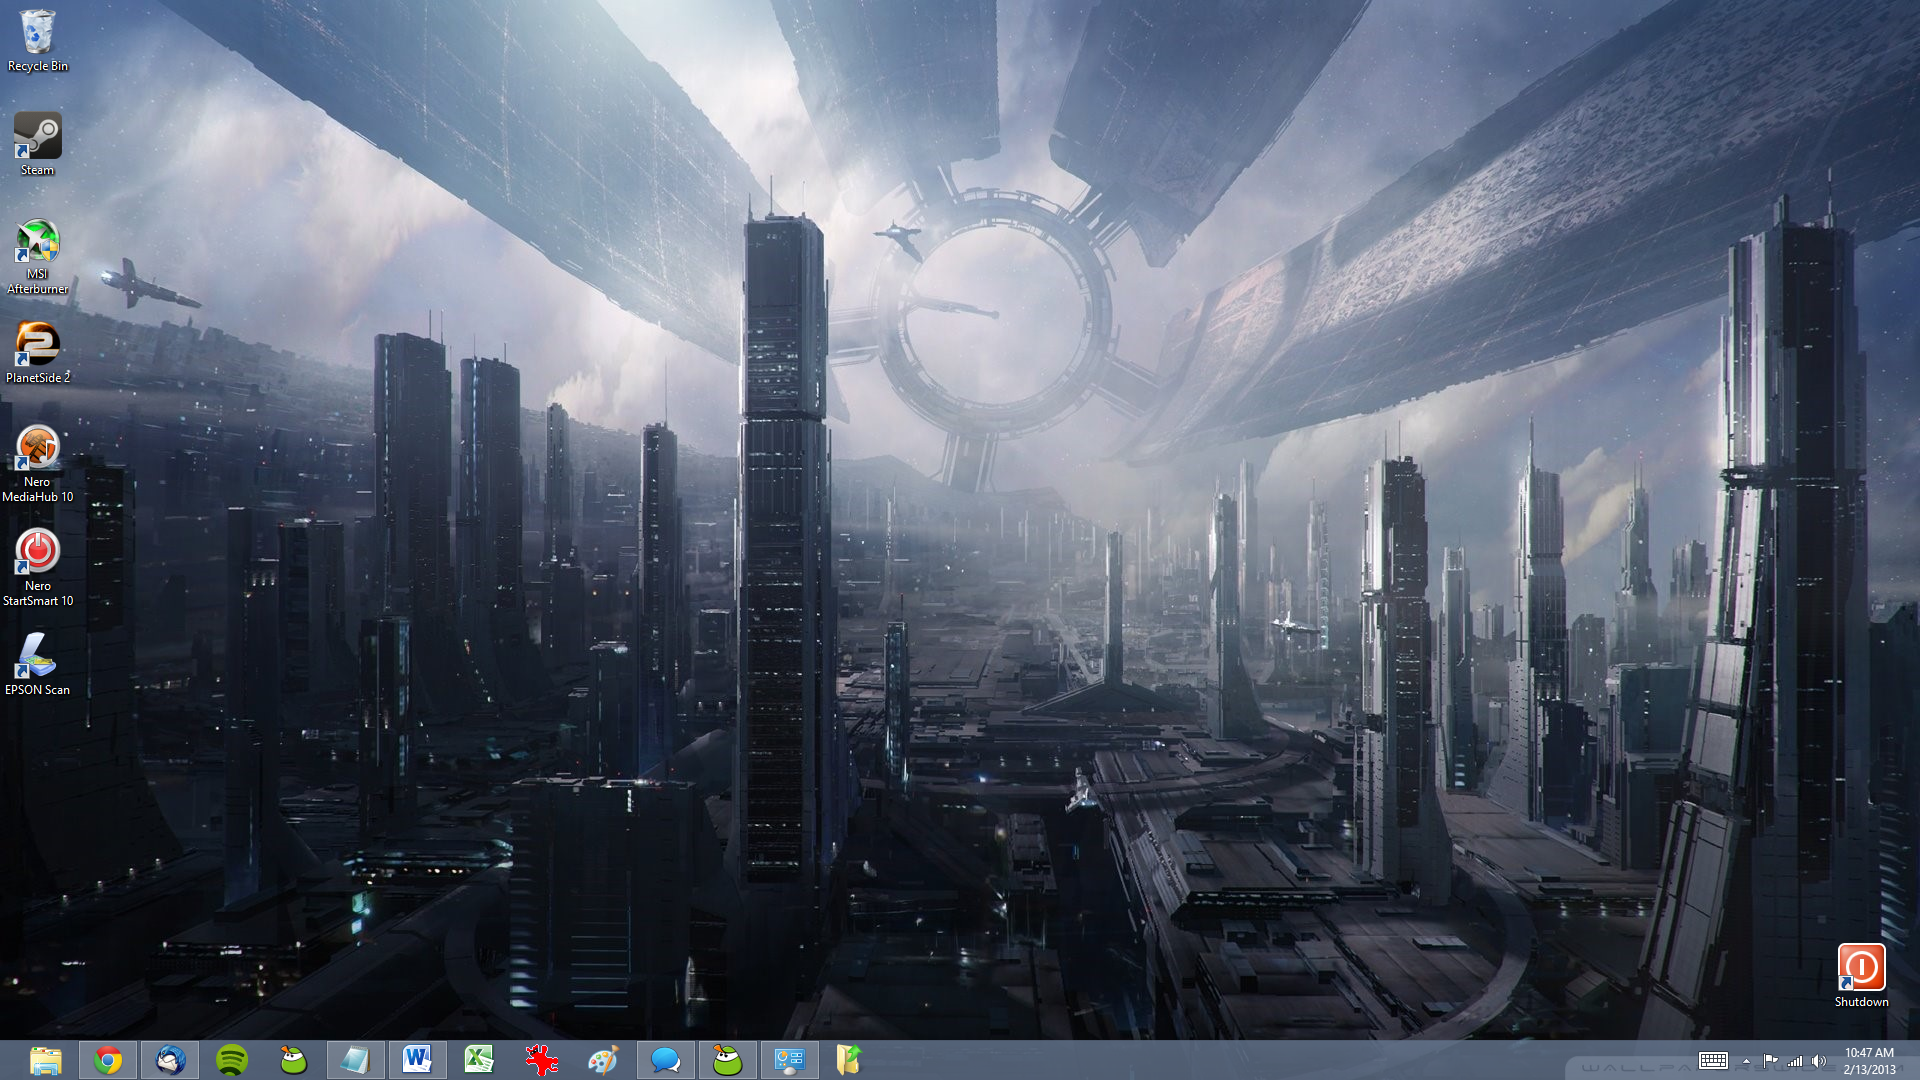
Behold the desktop of a Windows 8 PC well fortified to withstand Metro.
That's it: You've banished the Modern interface from your Windows 8
life! If you've followed all of the instructions above—and opted to go
the All Apps route rather than installing third-party Start button
software—your desktop should look something like the one showwn in the
screenshot. (The folder with the green arrow in the taskbar is the All
Apps shortcut.) Enjoy Windows 8's lightning-fast boot times and
extensive improvements under the hood, without the annoying new
interface.
To browse a list of your apps (or many of them, at least), you can
right-click any tile on the Start screen and select "All apps" on the
far right of the bar at the bottom -- or just press the Windows key + Z.
You'll see a list of every Windows 8 Store app on your PC, and some --
but not all -- of your Desktop apps. (I have yet to figure out how
Windows decides which Desktop apps to list under "All apps.")
Right-click any apps you want to pin and proceed as above.
By default, the tiles on the Start screen seem to be randomly placed
into groups, but you can group them however you like. To move a tile to a
different group, just drag and drop it wherever you want it, including
in the middle of a group -- the other tiles in the group will
automatically rearrange themselves to accommodate it.
To create a new group, drag a tile away from an existing group. When
you drag it far enough away from the group, and also far enough away
from other groups, a vertical bar appears. That means you can drop the
tile, and a new group will be formed with the app in it. Now drag other
tiles into the group.
To name the new group, hover your mouse over the bottom right corner of the Start screen and click the −
(minus) icon. All of your groups and tiles will minimize to small
thumbnails. Right-click a group, and a "Name group" icon appears in the
bar at the bottom of the screen. Click the icon, type in the group's
name, click the Name button and you're done. You can also move the group
to a different location on the Start screen: Right-click its thumbnail,
drag it where you want it to be and drop it there.
Windows 8 Store apps normally run full screen -- unlike Desktop apps,
they don't appear in resizable windows, and at first glance, it appears
that you can't run them side by side. However, using a feature that
Microsoft calls Snap, you can run two Windows 8 Store apps, two Desktop
apps, or one of each side by side. (Note that Snap works only if you
have a minimum screen resolution of 1366 x 768.)
First, make sure you're running both apps. When you're in one of the
apps, move your mouse to the upper-left hot corner. When a thumbnail of
your last location appears, move your mouse down, and thumbnails of your
currently running apps will appear. Click and hold the thumbnail of the
app you want to run side by side with the current one, and then drag
the thumbnail to the right and drop it. The two apps will now be running
side by side, with the one you just dragged appearing in a sidebar on
the left.
You can use each app as you would normally. There's a border with
three dots on it running on the right side of the app running in the
sidebar, separating the apps. Drag it to the left or right to resize the
app so it takes up more or less of the screen. To go back to running
just one app, drag the dotted bar to the edge of the screen.
3. Bring back the Start button
One of the biggest complaints about Windows 8 is that Microsoft
killed the very useful Start button on the Desktop. However, I've found
two downloads that bring back some of the Start button features. One of
them even lets you bypass the Start screen entirely and go directly to
the Desktop when you log into Windows 8. StartFinity Starter Edition
from WinAbility Software adds a Start button to the Desktop. Click it,
and up pops a list that looks quite similar to the old Windows 7 Start
menu, with links to Documents, Pictures, Music, Control Panel and so on.
You can also click Programs to see and run all your Desktop apps. The
Starter Edition is free, but if you want to customize the program,
you'll have to pay $14.95 for the full version.
Another option is Start8
from Stardock. It offers a menu that's much like the old Windows 7
Start menu, with links to programs, Control Panel, Documents and so on;
it also includes a search bar for finding programs and files.
In addition to offering a menu like Windows
7's Start menu, Start8 lets you bypass the Start screen and head
straight to the Desktop when you sign into Windows 8. Click to view larger image.
It may be slightly confusing to use at first, though, because in
order to pop up the menu, you press the Windows key instead of clicking a
Start button. (In place of the Start button at the left edge of the
taskbar is a Windows button; if you click that you'll go to the Windows 8
Start screen.)
Start8 also lets you boot directly to the Desktop, bypassing the
Windows 8 Start screen. It offers some other extras as well, such as
letting you disable the Charms bar when you're using the Desktop and disabling top-left hot corner on the Desktop. Start8 costs $4.99, but you can try it for 30 days for free.
Microsoft this week began talking up a new brand for its in-house Xbox
LIVE games that have been ported to Windows 8/RT.
Now dubbed PLAY, this is not really anything new, but rather a new push
to entice people to adopt Windows 8/RT in order to play familiar Xbox
LIVE games on a Windows device.
That said, I can understand why this is confusing to people.
Microsoft and its video game partners
create games for various Microsoft platforms, including Windows desktop,
Windows 8 (Metro mobile games, including Windows RT), Windows Phone,
and of course the Xbox 360. On the Xbox 360, all games are Xbox LIVE
enabled, meaning among other things that they supply achievements.
Microsoft ported Xbox LIVE games to
Windows first with its Games for Windows LIVE initiative. These games in
fact still exist, and while there aren’t a lot of them, compared to the
wider selection of Windows desktop games, more do appear regularly.
Microsoft then ported Xbox LIVE to
Windows Phone 7, giving game developers a choice: They could create
regular games for the platform or, by following a strict set of rules,
could alternatively create Xbox LIVE games for Windows Phone as well.
This continues in Windows Phone 8.
With Windows 8/RT, Microsoft is again
splitting things for game developers: Anyone can write and publish
(Metro) games for Windows 8/RT, and publish them to the Windows Store.
But by following a strict set of rules, developers can also create new
Xbox LIVE games for Windows 8/RT. So what’s Microsoft PLAY?
It’s the new brand for Metro-style Xbox LIVE games—or, more strictly,
Metro-style Xbox LIVE Arcade games—published by the in-house Microsoft
Studios and ported from other Xbox LIVE platforms, usually the Xbox 360.
Some of these games, like Hydro Thunder Hurricane, were available at
launch, and more are being added all the time: The Gunstringer: Dead Man
Running, Ilomilo Plus, and Toy Soldiers: Cold War Touch Edition were
all added recently.
If you are using Windows 8 or RT, the fastest way to find
these games (and other, non-Microsoft Xbox LIVE games for Windows 8/RT)
is to launch the Xbox Games app, not Windows Store. Then, just navigate
to the Windows Games Store. If you do want to buy or download a game,
that will be handed off to Windows Store at the appropriate time.
With Windows 8,
Microsoft is standardizing a lot of common tasks through new
system-level features such as charms, contracts, and settings. But this
standardization is causing some users fits, so I’m starting a new series
of tips aimed at helping you overcome some common gotcha’s. In part 2
of this series: Printing from Metro-style apps.
The
process for adding a printer in Windows 8 works much as it does in
Windows 7, and you can still use the familiar Devices and Printers
interface to connect to and configure printers, and the Homegroup- and
legacy-based methods for sharing printers with other PCs on your home
network.
The
Metro environment, however, requires a different approach. In Metro,
printers are managed, as you’d expect, through PC Settings, the new
Metro-style partial replacement for Control Panel. You can view and
remove connected printers and other devices, and add new printers and
other devices, through PC Settings, Devices. And if a printer is already
configured through the desktop environment, it will appear here as
well.
Most
of this is fairly obvious even to new Windows 8 users. But the one
thing that has clearly flummoxed many is this: How do you print from
Metro-style apps?
Printing, like
other similar system-level tasks, occurs consistently in all Metro-style
apps, in this case through the Devices interface, which can be reached
directly with the keyboard shortcut WINKEY + K or indirectly through
Charms, by enabling Charms (WINKEY +C) and then picking Devices. Either
way, you’ll see the Devices pane appear.
What
you’ll see in this pane is context sensitive—that is, it varies
depending on which Metro app or other experience you’re currently
view—and you’ll only see printers listed when the app or experience
explicitly supports printing.
Note:
You can often use the keyboard shortcut CTRL + P (as in desktop Windows
experiences) to bring up a Print pane instead of a devices pane. This
works just like the Devices pane except that it only lists printers (and
printer-like devices, such as “Send to OneNote”).
To
print, select the appropriate printer. This experience, too, will vary,
in this case by printer. But you should see a Printer Settings pane
that includes a print preview and basic printer settings, plus an
optional More settings link that will deliver more advanced settings.
Printer Settings
Advanced Printer Settings To print, simply click Print from the Printer Settings view.
With Windows 8,
Microsoft is standardizing a lot of common tasks through new
system-level features such as charms, contracts, and settings. But this
standardization is causing some users fits, so I’m starting a new series
of tips aimed at helping you overcome some common gotcha’s. In my third
tip, I’ll examine how Windows 8 doesn't just limit you to searching for
apps, settings, and files: You can also search in most Metro-style
apps.
Windows 8’s new Search
functionality is a formalized, system-level capability that most users
will encounter through the Search charm (WINKEY + Q), part of the Charms
bar (WINKEY + C). If you access this capability from the Start Screen
or Windows desktop, you’ll encounter its most common use, as a
replacement for the Window 7 Start Menu Search feature. Now called Start
Search, this handy capability lets you easily search for apps,
settings, and files using a consistent, full-screen interface.
This
Start experience reveals a second, even more innovative feature. As you
can see in the left pane of Start Search, there is also a list of
Metro-style apps that can be searched. This list doesn’t represent all
Metro-style apps installed on your PC, however. Instead, it represents
only those apps that have implemented the system-level Search contract.
And that means that you can search these apps too. Note: The
apps in the Search pane will not necessarily be in alphabetical order.
Instead, Windows 8 reorders them according to which you use the most
often, and you Pin favorite apps to the top by right-clicking them and
choosing “Pin.”
“Searching these apps” takes two forms, both of which work consistently.
First,
you can search from within any supported app of course, using the exact
same method you use to initiate Start Search from the Start Screen:
Just tap WINKEY + Q or choose Search from the Charms bar. When you do
this from within an app, the Search pane is scoped to your app, not the
system. So it will search within your app by default.
Second,
you can search an app from anywhere in the system. Just access Search
as before (again, WINKEY + Q). But this time, select the app you wish to
search from the Search pane on the right instead of leaving it with the
default selection. In this way, you could trigger, say, a search of
your Mail app-based email while browsing the web with Internet Explorer.
Note
that search results appear within the appropriate app. So if you select
Mail from the app list in the Search pane, the results will redisplay
using Mail’s custom search experience.
What
you’re searching for within any given app will depend on the app of
course. Here’s a list of what you can search for with Windows 8’s
built-in Metro-style apps: Finance. Search for companies using the company name (“Microsoft”) or stock symbol (“MSFT”). Mail. Search
for email using Windows 8’s new email app. Search will examine message
subject and body as well as the sender name and email address, and other
information. Maps. Find a location or, locally, a business using the Windows 8 mapping solution.
News. Search for news. You can enter virtually anything here; it works like a web search that’s filtered only to news results. People. Search
for contacts in Windows 8’s contacts management solution. Search will
look for matches in your contact’s names, but also in other information,
including email addresses. Photos. Search
for photos on your local PC, in connected online services, or on
SkyDrive-connected and linked PCs. Search uses file names and a limited
subset of photo meta-data to find what you’re looking for. Sports. Search for sports, including sport, team, and player names. This works like a web search that’s filtered only to sports results. Travel. Search the new Windows 8 Travel app for information about a favorite destination.
Weather. Search
for the weather in a specific location. Searches are stored in a Recent
Searches list in the Places view in the Weather app.
Windows Reader (Reader). Windows Store (Store). Search for Metro-style apps and desktop applications in Windows 8’s app store.
Xbox Companion. Search
for videos (TV shows and movies), games, and music on the Xbox
Marketplace that you will browse for on the Windows 8 PC or device but
play on your Xbox 360. Xbox LIVE Games. Search for games in the Windows and Xbox Marketplaces. Xbox Music (Music). Search for music—artists, albums, and songs—in Microsoft’s new Xbox Music Marketplace and in your own music collection. Xbox Video (Video). Search for movies or TV shows in Microsoft’s new Xbox Video Marketplace and in your own video collection. Note: Calendar,
Camera, Messaging, and SkyDrive cannot be searched. (At least in the
Windows 8 Release Preview. I’d be surprised if search wasn’t added to
Calendar and SkyDrive over time.) When you try to search using a
non-supported app, you’ll see an error message.
IM, Email, and Social Networks in one easy to use application!
One of Windows 8′s most-touted new features is its People hub, which
combines a comprehensive contact list with the ability to read and post
to Twitter and Facebook. Photos from friends who have recently updated
also appear on the People hub’s live tile and you can even create
dedicated tiles for individual friends. To add your Twitter, Facebook or other social media account to Windows 8:
Open the People app.
Click “Connected to”in the upper right corner of the screen. The Accounts menu appears.
Click Add an account.
Select a socianetwork you wish to add an account from. Right now, the app supports Facebook, Twitter and LinkedIn
Click on Connect.
Log in to your account. A screen appears saying that “you’re ready to go.”
Microsoft has made a point of advertising the performance enhancements
and optimizations being made to Windows 8. Although Windows 7 was well
received and typically offered better performance and stability than its
much-maligned predecessor, Windows Vista, Microsoft had some loftier
goals in mind for the jump to Windows 8.
Although it’s too early to confirm that Microsoft has achieved all
of their goals, it appears they're on the right track. Windows 8 has
generally been an improvement over Windows 7 on the few systems we've
installed the RTM release on: they boot up and shut down quicker, for
example, and overall performance seems faster. This makes sense, because
the new OS is built to boot and shut down faster than previous
editions, use less memory and disk space, consume fewer combined
processor and GPU resources, and accommodate a wider range of devices
and screen sizes.
The Windows 8 file manager, task manager, and even the setup process
itself has been optimized; the ultimate goal for these improvements is
to enhance performance and minimize resource consumption, which in turn
would lower power consumption and potentially improve battery life on
laptops, tablets and other mobile devices. So while it's not terribly
expensive to build a new PC tuned for Windows 8 (check out our guide to building a speedy Windows 8 PC for under $500)
you might want to try installing it on your old PC first and
implementing a few of the tricks and tweaks we've learned from testing
Microsoft's latest operating system.
Although
Windows 8 is Microsoft’s latest operating system, its minimum
requirements aren’t much higher than the ancient Windows Vista.
While Windows 8 is designed to be installed on cutting edge technology,
it was also engineered to work well on lower-performing hardware. In
fact, Windows 8’s system requirements are barely any higher than Windows
Vista’s, which was released almost six years ago.
According to Microsoft, Window 8’s hardware requirements are:
Processor: 1 gigahertz (GHz) or faster
RAM: 1 gigabyte (GB) (32-bit) or 2 GB (64-bit)
Disk space: 16 GB (32-bit) or 20 GB (64-bit)
Graphics card: Microsoft DirectX 9 graphics device with WDDM driver
If you’d like to take advantage of some of Windows 8’s ancillary
features and capabilities, these additional items will also be required:
To use touch, you’ll need a tablet or a monitor that supports multi-touch.
To access the Windows Store to download and run apps, you need an
active Internet connection and a screen resolution of at least 1024 x
768.
To snap apps, you need a screen resolution of at least 1366 x 768.
Internet access (ISP fees might apply)
With that said, Windows 8 should still install and run on some systems
that don’t meet these requirements. To test that theory we installed it
on an ancient Asus Eee PC 900, which is powered by a lowly, single-core
Intel Celeron M 900MHz CPU and paltry integrated Intel 915GM graphics.
The Eee PC 900 system had been updated with 2GB of memory and a 64GB
solid state drive, though.
ASUSThe
underpowered Asus EEE PC 900 netbook is almost five years old, but it
can still run Windows 8 pretty smoothly with a few tweaks.
As you probably suspect, Windows 8’s performance isn’t stellar on a
machine with such meager specifications, but the OS was surprisingly
smooth. It wasn’t until the system was taxed with a handful of running
applications and multiple open browser windows that things significantly
slowed. We managed to remedy the situation with some tweaking and
streamlining, and now we know enough to show you how you can optimize
Windows 8 on an older PC.
New OS, new issues
Before we dive into the actual Windows 8 tweaks we made to our low-end
Eee PC, we should mention that it is exceedingly common (and dare we say
expected) that any new operating system will have its fair share of
bugs. As such, it is paramount that users looking to migrate and get the
most out of Windows 8 download the latest patches for their software
and install the latest drivers for their hardware.
Although nearly any component or device that works with Windows 7 should
also work with Windows 8, there are low-level differences between the
operating systems that could affect compatibility, stability, and
performance. Keeping the OS patched and using the latest drivers
available for Windows 8 will help ensure optimal performance and
stability, so run Microsoft Update and seek out any new drivers
available for your components right away.
Don't rely on Microsoft
Microsoft may have made great strides in recent years to improve the
reliability and performance of Windows, and the company does include
some useful tools to help users maintain their systems, but there is
always room for improvement. Many free third-party applications are more
comprehensive and offer additional features than Microsoft’s built-in
tools and the adaptive nature of a few of Windows’ features consume
resources and can affect the user experience on slower hardware. Because
of this, it’s often beneficial to replace or augment some of the tools
built into Windows 8 and manually specify some settings to prevent the
OS from having to manage them on the fly.
If you have a hard drive, the first thing we’d recommend is replacing Windows 8’s built-in disk defragmenter (do not
use a disk defragmenter on a solid state drive). Windows 8’s built-in
defrag utility isn’t bad, but there are a few free solutions out there
that are much better. Defraggler, available for download at piriform.com,
is a free replacement for Windows’ integrated disk defragmenter, and
(because it does a more thorough job analyzing and remedying file
fragments) drives defragmented with Defraggler can theoretically offer
better performance. The real-world performance differences will be
miniscule, but on older hardware every little bit counts. We’d suggest
downloading and installing Defraggler immediately after installing the
OS. Do a Disk Cleanup to free up some space, update the OS, and then run
Defraggler to ensure the majority of the OS’ files are contiguous and
that they are placed on the fastest part of your hard drive.
Another free tool available at piriform.com, CCleaner, can also come in
handy when optimizing a system. Not only does CCleaner do a good job of
augmenting Windows’ built-in Disk Cleanup utility to better clean out
junk files and reclaim disk space, but it has easy-to-use options for
cleaning out startup items too. On a fresh installation of Windows 8,
the removal of unnecessary startup items is less important, but if
you’re upgrading a system that’s already running an older version of
Windows, all of the junk that’s polluted the original OS will migrate to
the Windows 8 upgrade, so all of the unnecessary junk should be cleaned
out.
Here's what we did for our aging Asus Eee PC: First, install Windows 8
to a freshly formatted drive. Next, update the OS and install any
patches and drivers available from Microsoft Update. Check the websites
of your major component manufacturers (your graphics card, monitor,
etc.) and install the latest drivers, then download and install CCleaner
from Piriform's website (mentioned earlier). If you're using a standard
hard drive (not an SSD), you should also download and install
Defraggler. Finally, run Windows’ built-in Disk Cleanup tool and
CCleaner. If you have a hard drive run Defraggler and defrag the disk
for optimum performance; we didn't need to do this since our eeePC is
now running an SSD.
Make some changes
Disabling superfluous graphical effects in Windows 8 will minimize memory use and make the OS feel snappier.
After installing the OS and cleaning up any junk leftover from the
installation and update procedures, we move on to tweaking some of
Windows 8’s settings to better suit our aged PC. Our first stop was the
Advanced System Settings menu, where we can alter the OS’ virtual memory
settings and visual options.To get to the Advanced System Settings in
Windows 8, switch to Desktop mode, click the Libraries shortcut in the taskbar, and then right-click on Computer. In the resulting context menu, select Properties, and the System control panel will open. Click on Advanced System Settings in the left pane of the window and the System Properties
control panel will open. Click on the Advanced tab, and then click on
the Settings button in the Performance section at the top to open the Performance Options
control panel. Once open, click on the Visual Effects tab at the top
and then tick the "Adjust For Best Performance" option and hit Apply. If
there is a particular visual effect you’d prefer to leave enabled, you
can individually select it here, but the more options that are disabled
the better your PC's performance will be.
While the Performance Options control panel is still open, click on the
Advanced tab at the top and on the resulting menu click on the Change
button in the Virtual Memory section.
Manually
configuring virtual memory settings and specifying a set paging file
size will prevent Windows from changing it on the fly.
There’s lots of debate as to how to best configure Windows’ paging file,
but unless you consistently run tons of applications a run out of
physical and virtual memory, Microsoft’s recommended paging file size
should be fine. The recommended size of the paging file is going to vary
based on how much memory is installed in your system; in our Eee PC,
which had 2GB of RAM, the recommended size for the paging file was
2039MB. By default, Windows will start with a smaller paging file and
scale it up on the fly if necessary. By manually specifying the paging
file size, Windows will no longer have to dynamically manage the file
and the recommended amount will always be available.
To specify the paging file size in Windows 8, select the Custom Size:
radio button in the middle of the Virtual Memory control panel and then
input the recommended paging file size in megabytes (listed at the
bottom of the window) in both the Initial Size and Maximum Size fields.
Then click the Set button, click OK, and the click OK to close the
Performance Options window. Click OK in the System Properties window as
well, then restart the computer if necessary. However, as noted earlier,
you really don't have to do this.
Disable unnecessary items
To further optimize Windows 8 on older hardware, we recommend disabling
as many unnecessary startup items and services as possible, disabling
any unused hardware, and turning off any nonessential Live Tiles.
Turning off Live Tiles couldn’t be any easier. On the Start Screen,
simply right-click on any Live Tile and select the option to turn it
off. By default, Windows 8 launches with the Sports, Travel, Finance,
News, Mail, Bing and Weather live tiles all active. If there are any you
can live without, disable them to prevent Windows 8 from constantly
fetching data and updating them.
After
a clean installation on an Asus Eee PC, Windows 8 would launch with 34
running processes and consume 30% (.6GB) of available memory.
There probably aren’t many hardware components that can be disabled, but
by doing so Windows will boot faster and with more available memory
because the component’s driver won’t be initialized. There are two ways
of disabling hardware—via the system BIOS or in Device Manager. The BIOS
method is preferred because the component won’t even be recognized by
Windows, which will prevent its drivers from loading at all. The exact
procedure is going to vary from system to system, but typically you’ll
have to press F2 or DEL when your system is first powered up to enter
the BIOS and then navigate to the Integrated Peripherals section where
items can then be disabled. To disable hardware components via Device
Manager, switch to Desktop mode; click the Libraries shortcut in the
taskbar, and then right-click on Computer. In the resulting context
menu, select Properties, and in the System control panel click on Device
Manger. When the Device Manger window opens, click on any arrow next to
a hardware group to expand the list, and the right-click on an item
you’d like to disable and select Disable from the context menu. On our
system, we disabled the wired network controller since we were using
Wi-Fi and also a Bluetooth controller. Many systems still have BIOS
entries for serial ports (RS-232); this can usually be disabled as well.
To disable unnecessary startup items, we’d once again recommend using
CCleaner. Windows 8’s built-in configuration utility (msconfig) will
work as well, but CCleaner’s startup menu is more comprehensive,
expandable, and easier to navigate. CCleaner also has the added benefit
of being able to list add-ons launching with Internet Explorer, should
you want to clean up the browser as well.
On a fresh Windows 8 installation, there won’t be many startup items to
consider. After an upgrade from a previous edition of Windows, or after
installing a myriad of applications, however, there will probably be
numerous items that can be eliminated. To disable unnecessary startup
items, launch CCleaner, then click on the Tools button on the left side
of the program’s menu, and then click on the Startup button. On the
Startup menu, click on the Windows tab, and every program that launches
with Windows will be listed. Delete any unneeded items, which usually
means everything except for anti-virus/anti-malware tools and any
utilities you use regularly. Any “helper” or “speed launcher” apps can
probably be disabled. If you’re unsure, Google the name of the program
to ascertain what it does and if it is essential.
There are multiple ways to disable services in Windows 8, but using the
System Configuration utility (aka msconfig) seems to be the most
foolproof and least confusing. To launch the System Configuration
utility, press the WIN+R key combination, type msconfig
in the run field and hit the Enter key. When the utility opens, click
on the Services tab and then tick the option at the lower left labeled
"Hide all Microsoft Services." What you’ll be left with is a list of
services installed with any application or drivers that were installed
on the system.
You shouldn't start disabling all services willy-nilly, but chances are many application-specific
services can be safely disabled. On our machine, even though we started
with a clean OS and installed only a few applications, we were still
able to disable four services, three associated with Google software
updates and another associated with Adobe Reader. There
may also be a couple of Microsoft services that can be disabled, like
the Theme service or the Touch Keyboard service (if you don’t have a
touch-screen), but tread lightly here; if you’re not certain a service
can be disabled, leave it alone.
Eliminate annoying UAC notifications
This recommendation may put off PC veterans who manage multiple systems
for other, less savvy users; if you are tweaking your personal PC,
however, it shouldn’t be an issue. Every time a UAC (User Account
Control) warning pops up, not only does it pause the system and require a
click, but the warning and screen dimming effect can take an eternity
on older hardware. Eliminating UAC notifications entirely can
significantly boost the performance of Windows 8 on aging hardware; to
minimize the number of pop-ups while still having some level of
additional protection, you can also just reduce the UAC notification
level.
User
Account Control is a security component in Windows which alerts users
to changes being made on the system. More experienced users can safely
lower the default UAC settings to prevent unwanted warnings and
interruptions.
To do so, slide out the Windows 8 charms by placing your mouse cursor in
either the upper- or lower-right corner of the screen and click on the
Search icon. Then highlight Settings in the Search panel and type UAC
into the search field. “Change User Account Control settings” will
appear in the left pane, click it, and the UAC Settings window will
open. Simply drag the slider down one notch so Windows 8 will no longer
dim the screen and will only notify you when an app tried to make
changes to the system. Dragging the slider all the way to the bottom
will disable all notifications, which is not recommended unless you're a
PC power user who is willing to take the risk.
Results
We collected some data on how these tricks affected our aging Asus Eee
PC running Windows 8, and here's what we came up with: immediately
following a fresh installation (and fully patching the OS via Microsoft
Update), Windows 8 would launch with 34 running processes, consume 30%
(.6MB) of available memory, and use 9.72GB on the disk in our particular
machine. After running Disk Cleanup and CCleaner, 9.52GB of disk space
was used. After disabling any unneeded startup items, visual options,
services, and hardware, running processes were reduced to the 33 and the
used memory dropped to only 20% (.4MB). Anecdotally, the PC seemed to
perform typical tasks faster (opening and closing applications, moving
files, etc.) and navigating the Windows 8 interface seemed to be much
smoother.
Windows 8 runs surprisingly well on older hardware.
The changes we outline here probably aren’t going to affect any
benchmark scores, but they will result in a snappier system with more
available memory and resources, which is exactly what’s necessary to
squeeze some additional life out of an aging PC. Try it out on your
hardware and let us know how it goes; if you’ve got some tweaks of your
own to optimize Windows 8, we’d love to hear them in the comments
section below.


 Earlier this year I
suggested that because Microsoft was unbundling Windows Media Center
from Windows 8, fans of the former should avoid upgrading to the latter.
Earlier this year I
suggested that because Microsoft was unbundling Windows Media Center
from Windows 8, fans of the former should avoid upgrading to the latter.